
Ducati Diavel Service Manual: Riding mode customisation
This function customises each riding style.
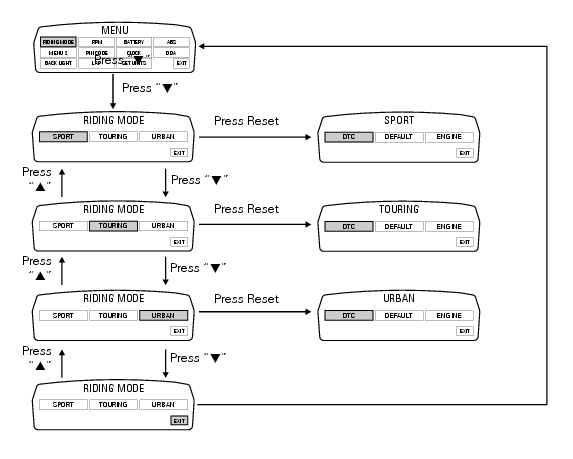
To access the function it is necessary to view the ""setting" menu", using buttons (1) "s" or (2) "t" select the "riding mode" function and press the reset button (3) to enter the following page.
When accessing the function, the three riding modes appear on the display; to customise the parameters, use buttons (1) "s" or (2) "t" to select the riding mode to be modified and press reset (3) to confirm.
The parameters that can be "customised" are "dtc" (ducati traction control) and '"engine".
Any parameter change made is saved in the memory also after a battery-off.
To modify the dtc parameters see the paragraph "dtc (ducati traction control) setting function".
To modify the engine parameters see the paragraph "engine setting function (engine power control)".
The parameters set by ducati for each individual riding style can be restored with the "default" function.
To reset the "default" parameters see paragraph "default function (resetting ducati default parameters)".
If the parameters have not been modified (customised) or are reset using the "default" function, when you quit the setting menu, in the "main" screen, the "background" indicating the riding style (sport, touring or urban) becomes blue (1).
Changes should only be made to the parameters by people who are experts in motorcycle setup; if the parameters are changed accidentally, use the "default function (resetting ducati default parameters)" to reset the parameters.

 Setting menu
This menu is used to enable/disable and set some motorcycle functions.
To access the "setting menu" press and hold button (2) "t" for 3 seconds.
Note
When within this menu no other function can b ...
 Dtc (ducati traction control) setting function
This function allows you to customise the level of dtc intervention (ducati
traction control) or disable it for every riding
mode.
To access the function it is necessary to view the ""setting" m ...
Other materials:
Replacing the battery in the active key
Only use 3 volt cr 2032 lithium ion batteries.
Note
The keys do not need to be reprogrammed after
replacing the battery.
Remove the metal part of the battery.
Use a large sized coin to pry open the shells of the plastic grip
(2? coin) as shown in fig. 65.
Important
Insert the coil on ...
Backlighting setting function for the instrument panel on Handlebar -
dashboard 2
This function allows backlighting setting of the instrument
panel on handlebar.
To access the function it is necessary to view the "setting" menu page 48, using
button (1, fig. 14) ?"
" or (2, fig. 14) ?" " select the "back light" function
and press ...
Adjusting the position of the gear change and rear brake pedals
The position of the gear change and rear brake pedals in relation to the
footrests can be adjusted to suit the preferred
riding position.
To modify the gear change pedal position act in the following mode:
hold the linkage (1) and slacken the counter nuts (2) and (3).
Note
Nut (2) has a lef ...