
Ducati Diavel Service Manual: Spark plugs replacement
Check the colour of the ceramic insulation around the central electrode: an even, light brown colour indicates the engine is in good condition and running at the right temperature.
Inspect the centre electrode for wear and check spark plug gap, which should be: 0.8+/-0.1 Mm.
Important
Check the gap between the central and side electrodes. Replace the spark plug if taken value is different from the specified one or the spark plug shows clear signs of carbon settling.
Important
Do not use spark plugs with inadequate thermal rating or incorrect thread length.
The spark plug must be securely installed.
If a spark plug is loose, it can overheat and damage the engine.
Spark plug type
Make: ngk
Type: mar9a-j


Remove the coil-spark plugs wires (1), loosening the screws (2) of both spark plugs.
Using the appropriate tool 88713.2877 To replace the spark plugs.

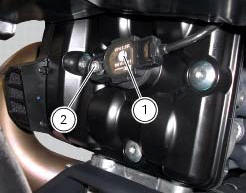
Place the coil-spark plugs wires (1) in the relevant seats and tighten the screws (2) to a torque of 10 nm (min. 9 Nm - max. 11 Nm) (sect. 3 - 3, Engine torque settings).

 Checking valve clearances
To check the valves clearance, it is necessary to have access to the cylinder
head covers and then remove the
components listed below.
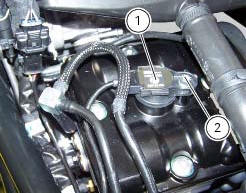
Unscrew the two fixing screws (1) of the cover (2) accord ...
 Changing and cleaning the air filters
The air filter must be replaced at the intervals described in the "scheduled
maintenance chart" (sect. 4 - 2).
Work on the vehicle right side, loosen screws (1) that secure the intake duct
(2 ...
Other materials:
Disassembling the water radiator unit
The procedure is the same for both radiators.
Loosen the screws (15), (21) and (25) to remove the air duct (24) from the right
radiator (13).
Undo the screws (12) and (14) to remove the half-fairing (23) from the
radiator.
Radiator inspection
Visually inspect the oil co ...
Removing of the rear footrests
The removal of the rear footrests is described for the right side but it is
the same for both.
Undo the pin (13) and remove the rh rear footrest (12) from the frame.
Recover washer (8) and the o-rings (9).
If necessary remove the rubber footrest (11) of the footrest (12).
...
Adjusting the steering head bearings
Note
To adjust the steering bearing clearance, follow what is described in
sect. 4 - 3, Adjusting the steering head bearings.
If the problems found are not solved, check the wear of steering bearings (6)
and replace them, if necessary, as described
in paragraph "removal of the steering head c ...