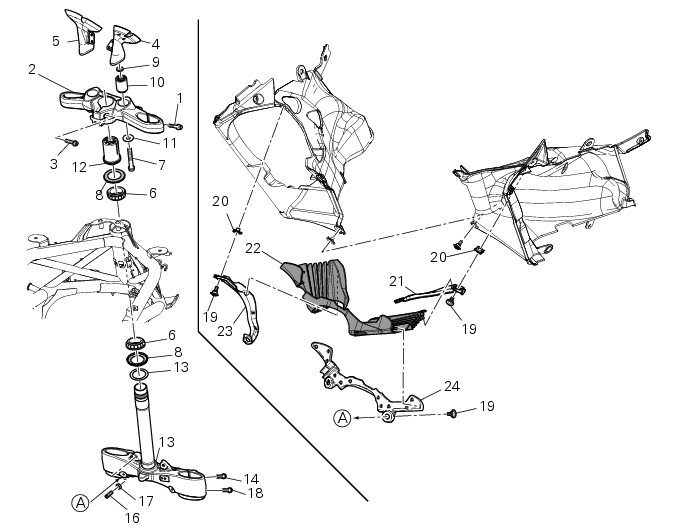
Ducati Diavel Service Manual: Steering head: steering

- Screw
- Steering head
- Screw
- Lower rh u-bolt
- Lower lh u-bolt
- Bearing
- Screw
- Sealing ring
- Washer
- Spacer
- Washer
- Nut
- Washer
- Screw
- Bottom yoke
- Dowel
- Nut
- Screw
- Special screw
- Clip nut
- Left-hand support
- Front splashguard
- Right-hand support
- Front support
Spare parts catalogue
Diavel abs handlebar and controls
Diavel abs half fairing
Diavel carbon abs handlebar and controls
Diavel carbon abs half fairing
Important
Bold reference numbers in this section identify parts not shown in the figures alongside the text, but which can be found in the exploded view diagram.
- Adjusting the steering head bearings
- Steering angle adjustment
- Removal of the steering head components
- Refitting the steering head components
 Refitting the front forks
Refit the fork legs, positioning them at the height shown in the figure
relative to the upper surface of the bottom yoke.
Warning
The difference in height between the two fork legs must be no ...
 Adjusting the steering head bearings
Note
To adjust the steering bearing clearance, follow what is described in
sect. 4 - 3, Adjusting the steering head bearings.
If the problems found are not solved, check the wear of steering beari ...
Other materials:
Removal of the front footrests
Note
The removal of the front footrests is described only for the right one (2)
but it is the same also for the left one.
Remove the circlip (5) by releasing the pin (3).
Slide the pin (3) off the frame by supporting the footrest (2).
Slide off the footrest (2) from its seat and collect th ...
Distance travelled on fuel reserve: trip fuel
This function shows the distance travelled on fuel reserve (in
km or miles depending on the specific application).
When the fuel light comes on, the display automatically
switches to the "trip fuel" indicator.
Trip fuel reading remains stored even after key-off until the
vehicle i ...
Engine setting function (engine power control)
This function customises engine power and output.
To access the function it is necessary to view the ""setting" menu", using
buttons (1) "s" or (2) "t" select the "riding
mode" function and press the reset button (3) to enter the following page.
Use button (1) "s" or (2) "t" to select the r ...