
Ducati Diavel Owners Manual: Tft - parameter setting/display
 Warning
Any adjustments to the instrument panel must only be carried out when the motorcycle is stationary. Never operate the instrument panel controls while riding the motorcycle.
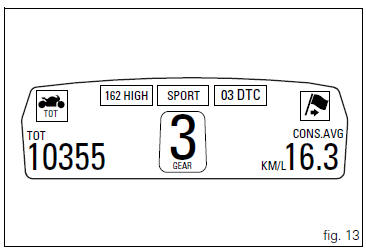
At the end of the check, the instrument panel always displays as the "main" indication the odometer (tot) on the left and the average fuel consumption on the right (unless menu 2 was disabled).
At the end of the initial check, the instrument panel will always show the "main" display, indicating the following information:
- Set "riding style" (riding mode);
- Gear indication (gear);
- Menu 1: odometer (tot);
- Menu 2: average fuel consumption (cons. Avg).
By pressing the (1, fig. 14) ?
button it is possible to switch
to the following functions of menu 1:
- Trip1 - trip meter 1;
- Trip2 - trip meter 2;
- Trip fuel - distance travelled on fuel reserve (only if active).
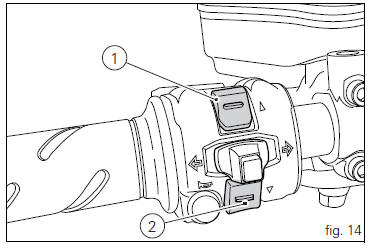
By pressing the (2, fig. 14) ?
button it is possible to switch
to the following functions of menu 2:
- Cons. - Current fuel consumption;
- Speed avg - average speed;
- Trip time - trip time;
- Air - air temperature.
 Note
Note
Menu 2 viewing can be disabled through the "menu 2" function of the setting menu.
 Instrument panel on tank
Menu 1 (tot, trip1, trip2, trip fuel).
Menu 2 (cons.Avg., Cons., Speed avg, air and
trip time) if active.
Gear / neutral indication.
Icon referred to the function below from menu 1.
Indic ...
 Total distance covered indicator: "odometer"
This function shows the total distance covered by the vehicle
(in km or miles depending on the specific application).
At key-on the system automatically enters this function.
The odometer readi ...
Other materials:
System components
Screw
Abs front speed sensor
Sealing washer
Hose grommet
Abs rear speed sensor
Abs control unit
Front pump - control unit pipe
Control unit - front callipers pipe
Rear pump - control unit pipe
Control unit - rear calliper pipe
Sealing washer
Support
Spacer
Rubber mou ...
Reassembling the front footrest brackets
To reassemble the brackets (6) and (21) carry out the removal procedure in
the reverse order; tighten the screws (7) to a
torque of 25 nm +/- 10% (sect. 3 - 3, Frame torque settings).
...
How to switch the dashboard on
The dashboard may switched on either from the on/off switch on the handlebar
or from the button on the hands free
system.
With the engine off, the on/off switch is turned to "run off".
With the motorcycle and dashboard off, the on/off switch is turned to "run
off".
To switch the dash ...