
Ducati Diavel Service Manual: Evaporative emissions canister system (usa versions only)
Usa models are equipped with an additional system with an evaporative emissions canister that prevents fuel fumes from being discharged into the atmosphere.
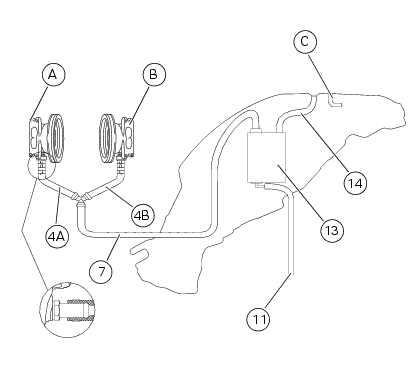
The breather hose (4) is connected to the canister filter (1); when the fuel has been filtered, it is returned through the hose (2) to the horizontal (a) and vertical (b) intake manifolds via the hoses (2a) and (2b). Drainage pipe (c) and the hose (5) vent to the ground.
For correct positioning of the connection hoses consult the indications given below.
 Evaporative emissions canister
Sealing washer
Union
Hose clip
Hose
Clamp
"T" fitting
Hose
Support
Special screw
Rubber mounting
Hose
Hose clip
Evaporative emissions canister
Hose
Spring
Spare p ...
 Removal of the evaporative emissions canister
Loosen the screws (9) securing the plate (8) to the tank.
Slightly pull the plate (8) with the canister (13), remove the clamps (3) and
(12) and connect hoses (7) and (14).
Release the ...
Other materials:
Removing of the abs control unit
Drain the hydraulic fluid that is inside the front and rear braking system
tubes by disconnecting them from the master
cylinder and the calliper (sect. 4 -3, Changing the brake fluid).
Disconnect the connector (a) of the abs control unit (6).
Loosen the screws (16) that retain the abs ...
Frame torque settings
*Dynamic safety-critical point; tightening torque must be within nm +/-5%.
Note
For product specifications and symbols, refer to "product specifications"
(sect. 1 - 2). ...
Removal of the front mudguard
Undo the screw (7) and remove the front brake lines (a) from the hose grommet
(4).
Undo and remove the special retaining screws (5): keep the spacers (6).
Remove the front mudguard (1).
Warning
The version provided with carbon mudguards features nylon washers
instead of the spacers (6) ...