
Ducati Diavel Service Manual: Evaporative emissions canister
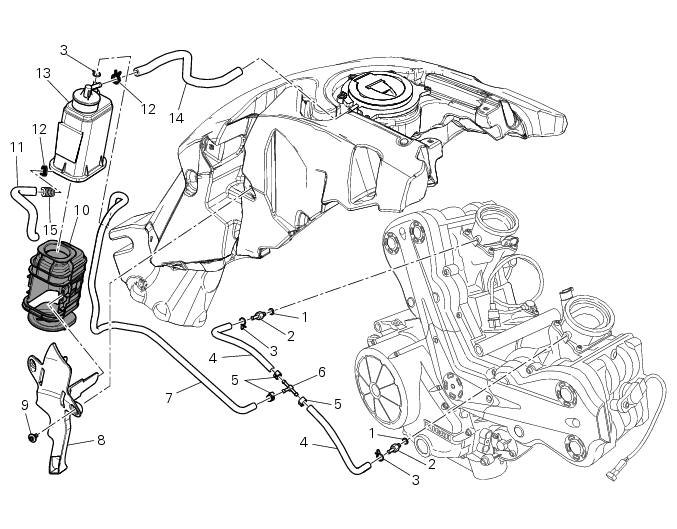
- Sealing washer
- Union
- Hose clip
- Hose
- Clamp
- "T" fitting
- Hose
- Support
- Special screw
- Rubber mounting
- Hose
- Hose clip
- Evaporative emissions canister
- Hose
- Spring
Spare parts catalogue
Diavel abs evaporative emissions canister
Diavel carbon abs evaporative emissions canister
Important
Bold reference numbers in this section identify parts not shown in the figures alongside the text, but which can be found in the exploded view diagram.
- Evaporative emissions canister system (usa versions only)
- Removal of the evaporative emissions canister
- Refitting the evaporative emissions canister
 Refitting the silencer
Position the silencer guard (41) and fix it by starting the screws (40).
Tighten the screws (40) to a torque of 8 nm +/- 10% (sect. 3 - 3, Frame torque
settings).
Insert the silencer (4) int ...
 Evaporative emissions canister system (usa versions only)
Usa models are equipped with an additional system with an evaporative
emissions canister that prevents fuel fumes from
being discharged into the atmosphere.
The breather hose (4) is connected to t ...
Other materials:
Keys (fig. 62)
The owner receives a set of keys comprising:
1 Active key (1, fig. 62)
1 Passive key (2, fig. 62)
It contains the code used by the "hands free" system for the
key-on, in different modes.
The active key (1, fig. 63) Is the one that is normally used:
press button (a, fig. 63) To ...
Key-on/key-off using the key on the hands free lock with the active key
Key-on can be performed by pressing the button (7) on the
hands free lock (1, fig. 77) And with the presence of the
active key (3, fig. 77).
Note
The active key (3, fig. 77) Has a range of approx. 1.5 M,
therefore it must be located within this range.
Key-off can be performed by pressing the ...
Removing the flywheel - generator assembly
Use the tool 88713.3367 Fixed to the m10 side stand fixing holes (d).
Secure the tool to the flywheel with the screws (e).
Unscrew the alternator-flywheel retaining nut (15).
Warning
While unscrewing the nut, apply axial pressure to the socket to
avoid damage or injury in the event of the ...