
Ducati Diavel Service Manual: Removal of the cooling system hoses and unions

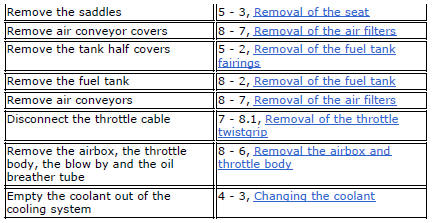
Loosen the clips (21) that secure the radiator/thermostat sleeve (40) and the radiator/plug sleeve (24) to the water radiators.
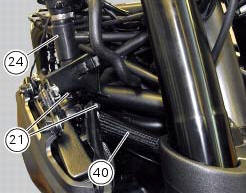

Loosen clips (25) and (43) that secure the breather pipe (26) to the radiator/plug sleeve (24) and to the left radiator.
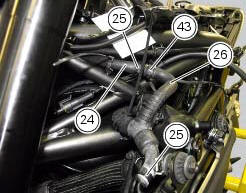
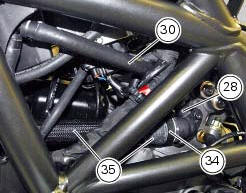
Loosen the clips (34) securing the thermostat assembly (38) - thermostat-cylinder head sleeve (35) - thermostat/cylinder head sleeve (37) to the cylinder heads.
Loosen the clip (28) to release the breather pipe (30) from the vertical head.
Loosen the clips (21) and (34) to disassemble the thermostat unit (38) - thermostat/head sleeve (35) - thermostat/head sleeve (37) - radiator/thermostat sleeve (40).
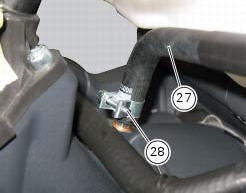
Loosen the clip (28) to release the breather pipe (27) from the half-casing.
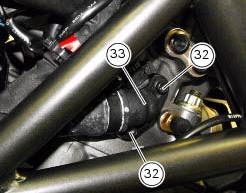
Loosen the screws (32) and remove the fitting (33).
Recover the o-ring gasket (31) located between the retainer and the vertical head.
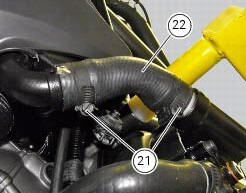
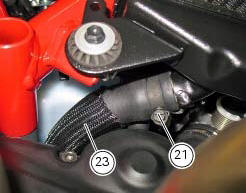
Loosen the clips (21) that secure the pump/radiator sleeve (22) and the radiator/radiator sleeve (23).
Important
Periodically check the connection hoses for leaks.
Hoses that are cracked, swollen, or hardened should be renewed.
 Refitting the expansion tank
If the support (15) has been removed, place the hose clamps (14) on the
bracket (15) orienting them as indicated.
Fully press the pins (a) to block the clamps (14) until pins surfaces (b) are at ...
 Refitting the cooling system hoses and unions
Position the pump/radiator sleeve (22) and the radiator/radiator sleeve (23).
Fit sleeve (23) and sleeve (22) to their corresponding fittings (n) and (o), and
bring them fully home on collars (p) ...
Other materials:
Checking engine oil level
Check the engine oil level through the sight glass (1) on the
clutch cover. When checking oil level, the motorcycle should
be perfectly upright and the engine cold. The oil level should
be between the two marks next to the sight glass. If level is
low, top up with shell advance ultra 4 engine oi ...
Beam setting
When checking beam setting, put the motorcycle upright.
Tyres should be inflated at the correct pressure and one
person should be sitting astride the motorcycle, keeping it at
right angles to its longitudinal axis. Place the motorcycle
opposite a wall or a screen, 10 meters apart from it, draw ...
General cleaning
To preserve the finish of metal parts and paintwork, wash
and clean your motorcycle at regular intervals, anyway
according to the road conditions you ride in. Use specific
products, where possible biodegradable. Avoid aggressive
detergents or solvents.
Use only water and neutral soap to clean ...