
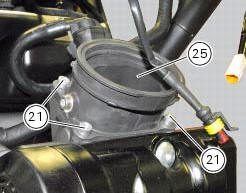
Ducati Diavel Service Manual: Removal of the intake manifold and coolant union
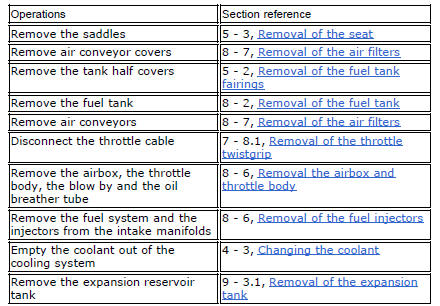
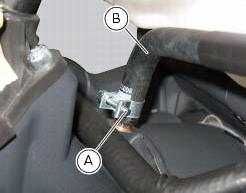
Loosen the clips (f) and remove the hoses (t).
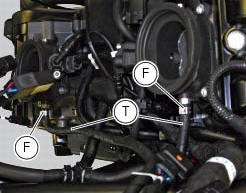
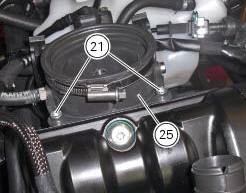
Remove the manifolds (25) undoing the screws (21).
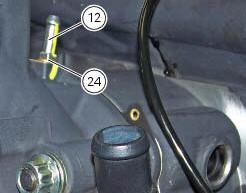
Loosen the clamp (a) and remove the hose (b). Remove the union (12) and recover the seal (24).
 Refitting the camshafts
If the stud bolts (2) were removed, apply the recommended threadlocker to the
short end of the stud bolts (2), i.E. The
end that is to be screwed into the cylinder head. Tighten the stud bolts (2) ...
 Refitting the intake manifold and coolant union
Apply prescribed threadlocker to the fitting (12), start it with seal (24)
and tighten it to a torque of 2.5 Nm (min. 2 Nm -
max. 3 Nm) (sect. 3 - 3, Frame torque settings).
Install the pipe (b) ...
Other materials:
Lap registration function
This function describes the "lap" time registration.
If the function is activated (see "lap activation/deactivation
description), the lap time can be registered as follows:
Pressing the flash headlight button (11, fig. 12) The first
time starts the "lap timer" for ...
Refitting the abs control unit
If the brake hoses (7), (8), (9) and (10) on the abs control unit are changed
or removed, ensure that the fittings on the
control unit are positioned correctly.
Warning
If incorrectly positioned, the hose can affect brake operation and
foul moving parts. Position the hose as shown in the
fig ...
Disassembly of the gearchange mechanism
Refer to the exploded view at the beginning of this section for indications
on disassembly and renewal of gearchange
components.
If the bushing (2) inside the pedal (1) needs replacing, grease the external
surface and drive the new bushing into place
using a press. The bushing must be seate ...