
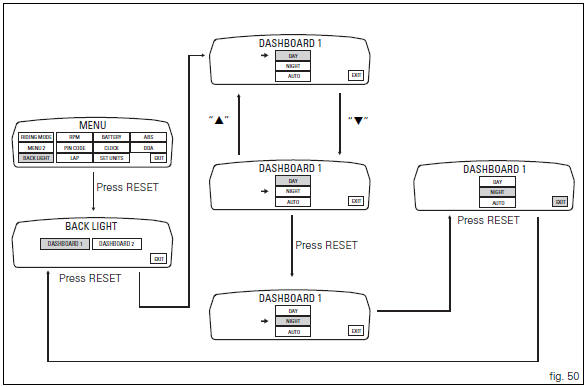
Ducati Diavel Owners Manual: Background setting function for the instrument panel on tank - dashboard 1
This function allows setting the "background" of the instrument panel on tank.
To access the function it is necessary to view the "setting" menu page 48, using
button (1, fig. 14) ?"
" or (2, fig. 14) ?" " select the "back light" function
and press the reset
button (12, fig. 12) To go to next page.
Use button (1, fig. 14) ?" " or (2,
fig. 14) ?" " to select the
"dashboard 1" function and confirm by pressing the
reset button (12, fig. 12).
Once you enter the "dashboard 1" function, setting is highlighted on the display
(day, night or auto in green); use button (1, fig. 14) ?"
" or (2, fig. 14) ?" " to shift the
arrow on the left onto the new setting and confirm by
pressing the reset button (12, fig. 12).
To exit the setting function, press the reset button (12, fig.
12) Where "exit" is highlighted.
?Gday" setting: instrument panel background becomes permanently "white" to improve readout view - recommended with bright exterior lighting.
?Gnight" setting: instrument panel background becomes permanently "black" for a more dimmed visibility - recommended with poor exterior lighting and/or dark.
?Gauto" setting: instrument panel background is set automatically according to exterior lighting conditions (detected by a sensor) and will be "black" for a more dimmed visibility with poor exterior lighting and "white" for an improved readout view with bright exterior lighting.
 Note
Note
In the event of an interruption of the power supply from the battery, when power is restored at the next key-on, the backlighting will always be set by default to "auto" mode.
 Menu 2 on/off function
This function turns off and back on the menu 2.
If menu 2 is disabled, the functions for average fuel
consumption (cons.Avg), instantaneous fuel consumption
(cons.), Average speed (speed avg), tr ...
 Backlighting setting function for the instrument panel on Handlebar -
dashboard 2
Backlighting setting function for the instrument panel on Handlebar -
dashboard 2
This function allows backlighting setting of the instrument
panel on handlebar.
To access the function it is necessary to view the "setting" menu page 48, using
button (1, fig. 14) ?&q ...
Other materials:
Removal of the intake manifold and coolant union
Loosen the clips (f) and remove the hoses (t).
Remove the manifolds (25) undoing the screws (21).
Loosen the clamp (a) and remove the hose (b). Remove the union (12) and
recover the seal (24).
...
General safety rules
Carbon monoxide
When a maintenance operation must be performed with the engine running, maker
sure that the working area is wellventilated.
Never run the engine in an enclosed space.
Warning
Exhaust fumes contain carbon monoxide, which is a poisonous gas that
can cause unconsciousness or e ...
Testing the battery charging system
Note
The on-screen icons used during this procedure are explained in a table at
the end of this section.
You can determine the engine rpm required for generator to produce just
enough current to charge battery, feed the
injection ignition system and all electric items fitted to motorcycle. Wh ...