
Ducati Diavel Service Manual: Evaporative emissions canister
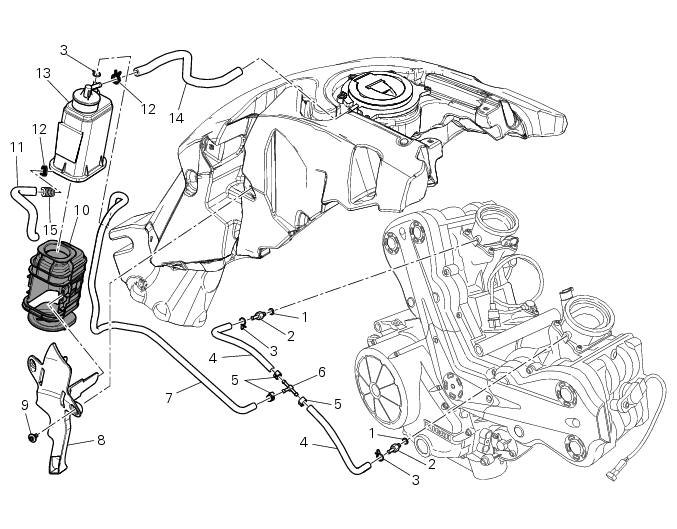
- Sealing washer
- Union
- Hose clip
- Hose
- Clamp
- "T" fitting
- Hose
- Support
- Special screw
- Rubber mounting
- Hose
- Hose clip
- Evaporative emissions canister
- Hose
- Spring
Spare parts catalogue
Diavel abs evaporative emissions canister
Diavel carbon abs evaporative emissions canister
Important
Bold reference numbers in this section identify parts not shown in the figures alongside the text, but which can be found in the exploded view diagram.
- Evaporative emissions canister system (usa versions only)
- Removal of the evaporative emissions canister
- Refitting the evaporative emissions canister
 Refitting the silencer
Position the silencer guard (41) and fix it by starting the screws (40).
Tighten the screws (40) to a torque of 8 nm +/- 10% (sect. 3 - 3, Frame torque
settings).
Insert the silencer (4) int ...
 Evaporative emissions canister system (usa versions only)
Usa models are equipped with an additional system with an evaporative
emissions canister that prevents fuel fumes from
being discharged into the atmosphere.
The breather hose (4) is connected to t ...
Other materials:
System components
Screw
Abs front speed sensor
Sealing washer
Hose grommet
Abs rear speed sensor
Abs control unit
Front pump - control unit pipe
Control unit - front callipers pipe
Rear pump - control unit pipe
Control unit - rear calliper pipe
Sealing washer
Support
Spacer
Rubber mou ...
Tank filler plug
Note
To open or close the tank filler plug using the active
key, set the metal part in the middle position, as shown on
page 86.
Opening
Lift the cover (1, fig. 100) And insert the active or passive key
into the lock. Give the key a 1/4 turn clockwise to unlock.
Lift the plug (2, fig. 101) ...
Instrument panel on handlebar
Lcd.
Neutral light n (green). Illuminates when the gearbox is in neutral.
High beam light (blue).
It turns on to indicate that the high beam lights are on.
Engine oil pressure light
(red).
Illuminates when engine oil pressure is too low. It must turn
on at key-on, but ...