
Ducati Diavel Owners Manual: Indication of range reached for service
When service coupon threshold is achieved, upon every key- on the system displays the indication of the type of intervention that is required (oil service or desmo service).
The (red) warning is activated as a large icon for 10 seconds upon every key-on (1, fig. 33) Then as a small warning that remains displayed (2, fig. 33) Until it is reset.
After reset, the system will display again the type of intervention required next and the residual range (as described in the previous paragraph).
 Warning
This message can only be reset by the ducati dealer or authorised service centre that performs the maintenance.
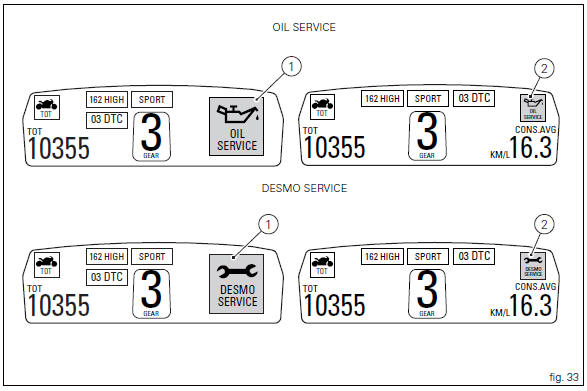
 Residual range indication when the service is due
After resetting the first oil service warning (triggered at
1000 km), upon every key-on the system displays the
indication of which type of service should be performed next
(oil service or desmo se ...
 Warning indication (alarms/signals)
The instrument panel activates in real-time some warnings /
malfunction that are not dangerous for the correct operation
of the vehicle.
At key-on (at the end of the check) one or more "warn ...
Other materials:
Air temperature sensor
Introduction
The engine control system on the diavel uses a sensor that measures air
temperature. This sensor has a resistance of
ntc type (negative temperature coefficient), that reduces its own value when the
temperature increases. The air
temperature sensor allows the engine control unit t ...
Removal of the evaporative emissions canister
Loosen the screws (9) securing the plate (8) to the tank.
Slightly pull the plate (8) with the canister (13), remove the clamps (3) and
(12) and connect hoses (7) and (14).
Release the retainers (b) of the plate (8) to remove it from the canister
(13).
Disconnect the hose ...
Removing of the rear footrests
The removal of the rear footrests is described for the right side but it is
the same for both.
Undo the pin (13) and remove the rh rear footrest (12) from the frame.
Recover washer (8) and the o-rings (9).
If necessary remove the rubber footrest (11) of the footrest (12).
...