
Ducati Diavel Owners Manual: Key-on/key-off using the key on the hands free lock with the active key
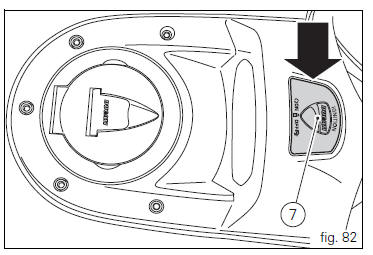
Key-on can be performed by pressing the button (7) on the hands free lock (1, fig. 77) And with the presence of the active key (3, fig. 77).
 Note
Note
The active key (3, fig. 77) Has a range of approx. 1.5 M, therefore it must be located within this range.
Key-off can be performed by pressing the button (7) on the hands free lock (1, fig. 77), Also without the key (3, fig. 77).
 Key-on/key-off using the red key on the handlebar with the active key
A key-on can be performed by pressing the red key (6) on
the handlebar in the hands free on/off position and in
the presence of the active key (3, fig. 77).
Note
The active key (3, fig. 77) Has a ...
 Key-on/key-off using the red key on the handlebar with the passive key
A key-on can be performed by pressing the red button (6) on
the handlebar in the hands free on/off position and in
the presence of the passive key (4, fig. 77).
Note
The passive key (4, fig. 77) ...
Other materials:
Information about the model
Identification data
Diavel identification data
Each ducati motorcycle has two identification numbers -the frame number and
the engine number- and an ec nameplate
(a) (not present on the us version).
Note
Please quote these numbers, which identify the motorcycle model, when
ordering spare pa ...
Stored lap erase function
This function erases the stored laps.
To access the function it is necessary to view the "setting" menu", using
buttons (1) "s" or (2) "t" select the "lap"
function and press the reset button (3) to enter the following page.
Use button (1) "s" or (2) "t" to select "lap data" indication and ...
Reassembling the clutch
Position the spacer (13).
Fit the flat ring (11) and the belleville washer (10) on the clutch center
(12), so that the convex side faces the clutch
drum.
Locate the belleville washer (8).
Apply the prescribed grease to the thread of the gearbox primary shaft and
the mating surfac ...