
Ducati Diavel Service Manual: Lap activation/deactivation function (lap time)
This function activates and deactivates the lap function (lap time).
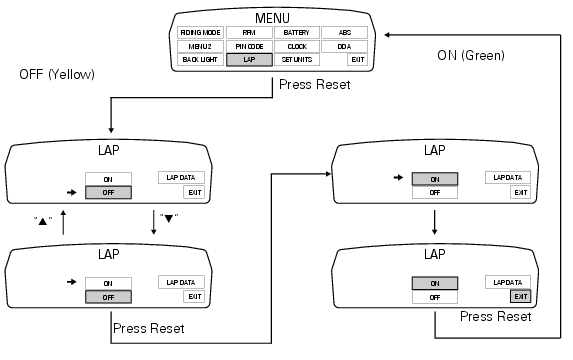
To access the function it is necessary to view the ""setting" menu", using buttons (1) "s" or (2) "t" select the "lap" function and press the reset button (3) to enter the following page.
Function state is highlighted on the display (on in green or off in yellow); use button (1) "s" or (2) "t" to shift the arrow to the left onto the new setting and confirm by pressing the reset button (3).
To exit the setting function, press the reset button (3) when "exit" is highlighted.
Storing the "off" condition disables the lap function.
Storing the "on" condition enables the lap function (see "lap registration" paragraph).
Note
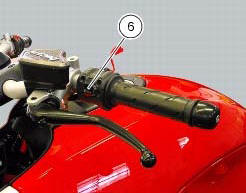
While the "lap" function is active, the flash headlight button (6) both flashes the high beam headlight and starts/stops the lap timer.
 Digital rpm indication function
This function displays the number of rpms for improved accuracy when setting
idle rpm.
To access the function it is necessary to view the ""setting" menu", using
buttons (1) "s" or (2) "t" select ...
 Lap registration function
This function describes the "lap" time registration.
If the function is activated (see "lap activation/deactivation description), the
lap time can be registered as follows:
pressing the flash he ...
Other materials:
Stands
Side stand
Side stand switch
Screw
Plate
Screw
Inner spring
Outer spring
Nut
Rotation pivot
Screw
Screw
Screw
Nut
Clearance adjuster
Spare parts catalogue
Diavel abs stand
Diavel carbon
abs
stand
Important
Bold reference numbers in this section identify part ...
Limited liability
The liability of ducati under this emission control systems
warranty is limited solely to the remedying of defects in
material or workmanship by an authorized ducati motorcycle
dealer at its place of business during customary business
hours. This warranty does not cover inconvenience or l ...
Headlight control
This function allows you to reduce current consumption from
the battery, by automatically managing headlight switchingoff.
At key-on, the high beam and low beam lights are off.
When the engine is started, the low beam lights turn on
automatically; from this moment, "normal" operati ...