
Ducati Diavel Service Manual: Removing the timing belt driveshaft pulleys
Use the tool code 88713.1805 To hold the driving pulley on the engine crankcase against rotation.
Important
If this operation is carried out with the engine installed in the frame, hold the driveshaft pulleys against rotation using the tool code 88713.2011 Mounted on the alternator cover.
Loosen the nut (15) using the socket supplied with the service tool.
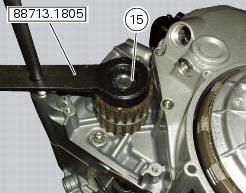
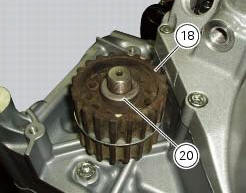
Remove the nut (15), the spacer (20) and the outer pulley (18).
Remove the first woodruff key (16) from the timing belt driveshaft.
Remove the intermediate spacer (19) and the inner pulley (18).
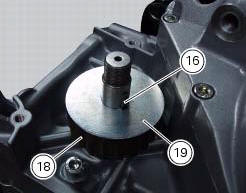
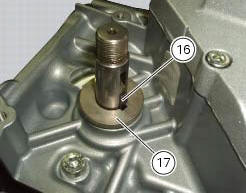
Remove the inner spacer (17) and second woodruff key (16) on the timing belt driveshaft.
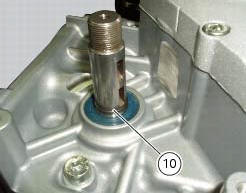
It is now possible to remove the circlip (10) on the driveshaft.
 Disassembly of the camshaft pulleys
Unscrew and remove the screws (22).
Slide off the washer (23).
Withdraw the camshaft pulley (11) from the spacer flange (24).
...
 Refitting the timing belt driveshaft pulleys
To fit the circlip (10) in the driveshaft seat, use the tool code 88713.2834.
Install the inner spacer (17) on the driveshaft, taking care to align the
notch in the spacer with the slot for the ...
Other materials:
Riding safety
The points given below are applicable for every day
motorcycle use and shoud be carefully observed for safe and
effective vehicle operation.
A motorcycle does not provide the impact protection of an
automobile, so defensive riding in addition to wearing
protective apparel is extremely importa ...
Removal of the rear brake calliper
Important
The brake manufacturer advises against any servicing of the internal
components of brake callipers or the master cylinder.
Incorrect overhaul of these critical safety components can endanger rider and
passenger safety.
Before removing the parts in question, you must first carry ou ...
Clutch lever button
Introduction
The clutch button is located on the clutch lever. Together with the signal
from the side stand button and the neutral signal
generated by the gear sensor (transmitted to the engine control unit over the
can line), the clutch lever position signal is
used to enable or disable engi ...