
Ducati Diavel Service Manual: Refitting the idler and tensioner pulley mounting studs
Apply the recommended threadlocker to the threads of the studs.
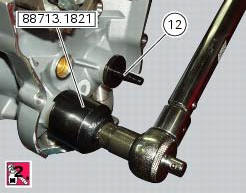
Insert the tensioner pins (12) on the cylinder heads, and tighten them using the tool code 88713.1821.
Tighten the tensioner pins to a torque of 50 nm (min. 45 Nm - max. 55 Nm) (sect. 3 - 3, Engine torque settings).
 Refitting the timing belt driveshaft pulleys
To fit the circlip (10) in the driveshaft seat, use the tool code 88713.2834.
Install the inner spacer (17) on the driveshaft, taking care to align the
notch in the spacer with the slot for the ...
 Reassembly of the timing pulleys
Fit the pulley (11) on the flange (24), aligning the timing mark (d) on the
pulley with the timing mark on the (e) on the
flange.
Install the washer (23) up against the pulley, aligning the timi ...
Other materials:
Scheduled maintenance chart
Operations to be carried out by the dealer
List of operations to be performed at 1000 km
Reading of the error memory with dds on the engine control units, vehicle and
abs
Change the engine oil
Change the engine oil filter
Check the indicators and lighting
Check the safety devices (side stand ...
Background setting function for the dashboard on tank - dashboard 1
This function allows setting the "background" of the dashboard on tank.
To access the function it is necessary to view the ""setting" menu", using
buttons (1) "s" or (2) "t" select the "back
light" function and press the reset button (3) to enter the following page.
Use button (1) "s" or (2 ...
Refitting the tail light
Fit the spacers with collar (3) into the rear vibration dampers (2) located
on the gloves compartment (23).
Note
Two spacers (3) must be inserted inside and outside on the right side and
two spacers (3) must be inserted inside and
outside on the left side.
Insert the split vibration damp ...