
Ducati Diavel Service Manual: Refitting the rear sprocket
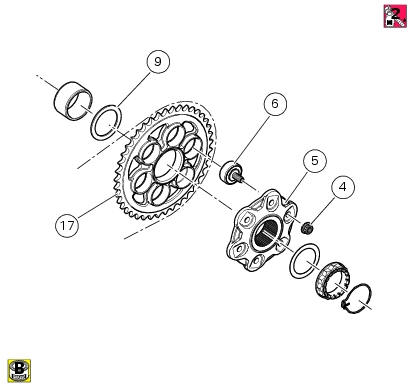
Check the cush drive bushes (6) condition and, if necessary, replace them by removing them from the flange.
Refitting is the reverse of removal.
Apply recommended grease on the rear sprocket flange (5) external diameter.
Place the rear sprocket flange (5) on sprocket (17) by inserting it on cush drive damper pins (6).
Apply prescribed threadlocker on the nut threads (4).
Start the nuts on the cush drive damper pins (6) threaded side.
Tighten the nuts (4) to a torque of 44 nm +/- 10% (sect. 3 - 3, Frame torque settings), following a cross-pattern sequence.
Check for wear following the instructions given at the beginning of this section.
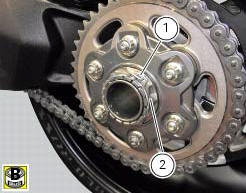
To refit the nut (2) follow the specifications for the wheel fixing nut, in sect. 7 - 2, Refitting the rear wheel.
Position the clip (1) as shown.

Washing the chain
Chains with o-rings must be washed in oil, diesel fuel or paraffin (kerosene).
Do not use fuel, trichloroethylene or other solvents which will damage the rubber o-rings. For the same reason use only sprays specifically formulated for use with o-ring chains.
 Replacing of the rear sprocket
Lock the wheel axle rotation.
Remove the clip (1).
Loosen the locking nut (2) with a socket wrench.
Fully unscrew the nut (2) and remove the washer (3) and the flange (5) with the
sproc ...
 Lubricating the chain
O-ring chains have sealed, life-lubed link studs and bushes. However, these
chains need lubricating at regular intervals to
protect metal parts of the chain and the o-rings.
Lubrication also ser ...
Other materials:
Refitting the rear wheel eccentric hub and rear wheel shaft
Refitting is the reverse of removal, with attention to the following points.
If the calliper bracket locating pin (14) was removed, apply the recommended
threadlocker on reassembly.
Tighten the pin (14) to the torque of 33 nm +/- 5% (sect. 3 - 3, Frame torque
settings).
If previously ...
Checking and overhauling the components
Clearance between the clutch drum and friction plates
Insert a friction plate (e) in the clutch drum (f) and measure the clearance
(s) with a feeler gauge.
Clearance "s" must not exceed 0.6 Mm.
If it does, renew the plates and, if necessary, the clutch drum.
Overhaul of the clutch plat ...
Removing the water radiators
Loosen the screws (p) that retain the supports (s) of the front splashguard
to the air ducts (24) and (26).
Loosen the screws (30), to separate the two internal air ducts (24) and (26).
Disconnect the wiring connectors of the main wiring loom (c) from both fans.
Disconne ...