
Ducati Diavel Service Manual: Refitting the throttle twistgrip
Lubricate the ends of the throttle grip cables (10) and the twistgrip race with the recommended grease.
The closing cable (10) features a writing on the yellow tube, whereas the opening one (10) features such writing on the white tube.
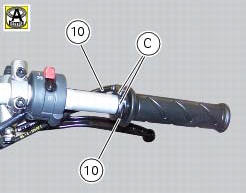
To refit the throttle control components, proceed in inverse order to the removal procedure, making sure that the twistgrip housings locate in the reference hole in the handlebar.
Tighten the screws (b) of throttle twistgrip (6) to a torque of 10 nm +/- 10% (sect. 3 - 3, Frame torque settings).
 Removal of the throttle twistgrip
Peel back the rubber sleeve (a) protecting the throttle control cables.
Undo the screws (b) of the throttle grip (6) and open the command.
Disconnect the throttle grip cables (10) by unhooking ...
 Hydraulic clutch control
Special screw
Sealing washer
Clutch master cylinder
Clutch hydraulic pipe (metal braid)
Screw
Spare stand
Washer
Microswitch
Pin
Bleed valve
Screw
Roller
O-ring
Clutch ...
Other materials:
Headlight aim
The motorcycle must be perfectly upright with the tires inflated to the
correct pressure and with a rider seated, perfectly
perpendicular to the longitudinal axis.
Position the motorcycle 10 metres from a wall or a screen.
On the wall or surface, draw a horizontal line at the same height fr ...
Wiring diagram colour codes
B blue
Bk black
Bn brown
G green
Gr grey
Lb light blue
O orange
P pink
R red
V violet
W white
Y yellow
Rear left fuse box (1) key
Rear right fuse box (2) key
...
Removing the timing belt driveshaft pulleys
Use the tool code 88713.1805 To hold the driving pulley on the engine
crankcase against rotation.
Important
If this operation is carried out with the engine installed in the frame,
hold the driveshaft pulleys against rotation using the
tool code 88713.2011 Mounted on the alternator cover.
Lo ...