
Ducati Diavel Service Manual: Removal of the clutch transmission unit
Warning
The manufacturer of the clutch transmission unit (15) advises against servicing of its internal parts due to the safetycritical nature of this component.
Incorrect overhaul of these critical safety components can endanger rider and passenger safety.
The only components that should be renewed are the complete clutch transmission unit, the bleed valve, the seals and the complete clutch pushrod assembly.

Undo the screws (11) and slide out the clutch slave cylinder (r).
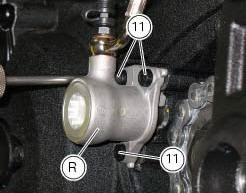
Remove the dust gaiter (16) and the bleed valve (17) and unscrew the screw (18), taking care to recover the gaskets (19): the unit (r) is now disconnected from the pipe (4).
Push in the piston to force out all the fluid from inside the cap.

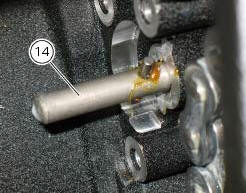
At this point, it is possible to slide also the clutch gear rod (14).
 Refitting the clutch master cylinder assembly
Insert the clutch master cylinder assembly (3) and the clamp (6) on the left
handlebar, so that the top mating faces
match the mark (z) on the handlebar as shown.
Couple terminal (6) to th ...
 Refitting the clutch transmission unit
Position pipe (4) on the clutch slave cylinder (r).
Position the two seals (19) and tighten the screw (18) to a torque of 23 nm +/-
10% (sect. 3 - 3, Frame torque settings).
Refit the bleed valv ...
Other materials:
Throttle twistgrip
Upper clamp
Counterweight
Screw
Handlebar
Grips
Throttle twistgrip
Bush
Screw
Bush
Throttle cables
Spare parts catalogue
Diavel abs handlebar and controls
Diavel carbon
abs
handlebar and controls
Important
Bold reference numbers in this section identify parts not sh ...
Renewal of the headlight
Disconnect the headlight connectors (a) from the main wiring (refer to the
tables of paragraph "routing of wiring on
frame", sect. 6 - 1).
Loosen nuts (2) that fix the front optical unit to the bottom yoke, and
recover the washers (3).
Remove the complete front optical unit by sliding ...
Refitting the rear-view mirrors
Start the screws (2) in their thread on the rear-view mirrors (1), inserting
the washers (4) as shown in the picture.
Insert the rear-view mirrors (1) in the u-bolts (3).
Tighten the screws (2) to a torque of 25 nm +/-10% (sect. 3 - 3, Frame torque
settings).
Warning
The left rear-view ...