
Ducati Diavel Service Manual: Renewal of the cooling fan
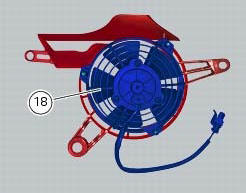
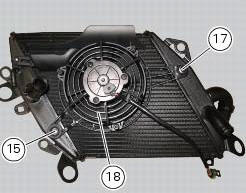
Loosen the electro-fan retaining screws (15) and (17) and remove the electro-fan (18) from the radiator.
Carry out the same procedure for the other radiator's electro-fan.
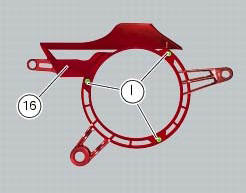
On refitting, position the coolant radiator fan (18) as shown on the fan support (16), so that the three fan holes match the three threaded inserts (i) of the support (16).
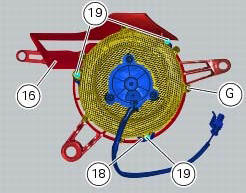
Position the grille (g) as shown on the coolant radiator fan (18), threading the fan cable out of the opening in the grille.
Assemble grille (g), fan (18) and fan support (16).
Tighten the screws (19) to a torque of 1 nm +/- 10% (sect. 3 - 3, Frame torque settings).
Tighten screws (15) and (17) to a torque of 5 nm +/- 10% (sect. 3 - 3, Frame torque settings).
 Disassembling the water radiator unit
The procedure is the same for both radiators.
Loosen the screws (15), (21) and (25) to remove the air duct (24) from the right
radiator (13).
Undo the screws (12) and (14) to remove the ...
 Reassembling the water radiator unit
The procedure is the same for both radiators.
Check the presence of clips (1) at the positions of the external coolant
radiator cover (23).
If removed, fit the front turn indicator (32) on the ...
Other materials:
Overhaul of the flywheel-alternator assembly
Examine the inner part of alternator rotor (24) for signs of damage. Check
that the starter clutch is working properly and
that the needle races do not show signs of wear or damage of any kind. If there
is any malfunction, remove the whole
assembly.
Disassembling the generator flywheel
U ...
Fuel system circuit
The fuel system circuit consists of:
An electric pump, driven by the injection relay, which is in turn
controlled by the ecu (engine control unit)
A fuel filter
A pressure regulator
Two injectors (one per cylinder, located downstream of throttle valve)
The plastic mounting shown in t ...
Removal of the primary drive gear
Withdraw the clutch housing (1) complete with driven gear of the primary pair
(a).
Remove the inner spacer (2).
Remove the oil pump (d) (sect. 9 - 2.1, Removal of the oil pump).
Lock the primary pinion (b) with the holding tool 88713.3417 And loosen the
threaded ring nut (3) u ...