
Ducati Diavel Service Manual: Adjusting the position of the gear change and rear brake pedals
The position of the gear change and rear brake pedals in relation to the footrests can be adjusted to suit the preferred riding position.
To modify the gear change pedal position act in the following mode: hold the linkage (1) and slacken the counter nuts (2) and (3).
Note
Nut (2) has a left-hand thread.
Fit an open-end wrench to hexagonal element of linkage (1) and rotate until setting pedal in the desired position.
Tighten both check nuts onto linkage.

To adjust the position of the rear brake pedal, proceed as follows.
Loosen counter nut (4).
Turn pedal travel adjusting screw (5) until pedal is in the desired position.
Tighten the counter nut (4).
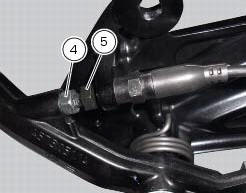
Work pedal by hand to make sure it has 1.5 - 2 Mm free play before brake begins to bite.
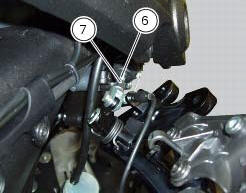
If not, check to modify the length of the cylinder push-rod in the following mode.
Slacken off the counter nut (7) on the pushrod.
Screw the rod into the fork (6) to increase play, or unscrew it to reduce play.
Tighten the counter nut (7) and recheck the pedal free play.
 Adjusting the clutch lever and front brake lever
The clutch lever (1) is fitted with a span adjuster (2) which serves to alter
the distance of the lever from the handlebar.
The lever distance can be adjusted through 10 clicks of the dial (2). T ...
 Adjusting the front fork
The front fork used on this motorcycle has rebound, compression and spring
preload adjustment.
This adjustment is done using the outer adjusters:
Rebound damping;
Inner spring preload;
Co ...
Other materials:
Removal the airbox and throttle body
Loosen the screws (a) and remove the plate (b) that fixes the main wiring to
the airbox.
Undo the screws (17) and remove the air pressure sensors (9) with the support
(19).
Release the hoses (c) of the air pressure sensors (9) from the tab (d) on the
airbox.
Operating on the ...
Draining the clutch hydraulic circuit
Warning
Clutch fluid will damage painted surfaces if spilled on them. It is
also very harmful if it comes into contact with the skin or
with the eyes; in the case of accidental contact, wash the affected area
thoroughly with plenty of running water.
Remove the dust cap to expose the bleed val ...
Symbols - abbreviations - references
To allow quick and easy consultation, this manual uses graphic symbols to
highlight situations in which maximum care is
required, as well as practical advice or information. Pay attention to the
meaning of the symbols since they serve to avoid
repeating technical concepts or safety warnings th ...