
Ducati Diavel Service Manual: Disassembly of the crankshaft/connecting rods assembly
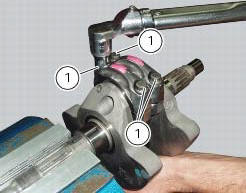
Unscrew the screws (1) and separate the connecting rods from the crankshaft.
Important
Take care not to mix up components of different connecting rods and maintain the original orientation.
 Removal of the crankshaft/connecting rods assembly
After separating the crankcase halves, withdraw the crankshaft (6) complete
with connecting rods (2).
...
 Overhaul of the connecting rods
Make the following dimensional checks on the connecting rods:
Clearance with gudgeon pin on assembly.
In the event of excessive wear (sect. 3 - 1.1, Crankshaft), replace the
connecting rod.
...
Other materials:
Adjusting the front fork
The front fork used on this motorcycle has rebound,
compression and spring preload adjustment.
The settings are adjusted using external adjuster screws.
To adjust rebound damping (fig. 109);
To adjust spring preload (fig. 109);
To adjust compression damping (fig. 110).
Park the mo ...
Refitting the abs control unit
If the brake hoses (7), (8), (9) and (10) on the abs control unit are changed
or removed, ensure that the fittings on the
control unit are positioned correctly.
Warning
If incorrectly positioned, the hose can affect brake operation and
foul moving parts. Position the hose as shown in the
fig ...
Removing the frame and the lateral footrests
Loosen the two special screws (6) to separate the frame (1) from the lateral
brackets (2) and (3).
On the left side of the vehicle block retaining pins (9) and loosen the nuts (8)
on the right side at the same time.
Slide out the retaining pins (9) and remove the frame (1) from the lateral ...