
Ducati Diavel Service Manual: Gearchange mechanism
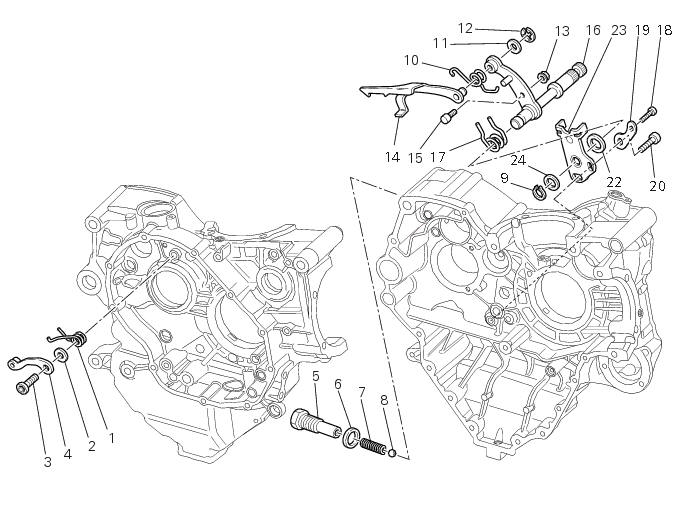
- Return spring
- Washer
- Special screw
- Gear pawl assembly
- Interlock plunger holder
- Sealing washer
- Detent ball spring
- Ball
- Circlip
- Selector claw return spring
- Shim washer
- Ring
- Nut
- Selector drum control fork
- Gearchange lever pin
- Shaft with gearchange lever arm
- Gearchange lever arm return spring
- Screw
- Spacer
- Screw
- Gearchange mechanism
- Locating ring
- Stop plate
- Shim washer
Spare parts catalogue
Diavel abs gearchange control
Diavel carbon abs gearchange control
Important
Bold reference numbers in this section identify parts not shown in the figures alongside the text, but which can be found in the exploded view diagram.
- Removal of the gear selector lever
- Disassembly of gear interlock plunger and pawl assembly
- Refitting the gear interlock plunger and pawl assembly
- Refitting the gear selector lever
 Gearbox assembly
...
 Removal of the gear selector lever
Unscrew and remove the fixing screws (18) and (20) of the complete gear
selector lever (21) and collect the spacer (19).
Remove the gearchange mechanism complete with the shaft, spring, and s ...
Other materials:
Refitting the rear mudguard
Place the rear mudguard (8) on the swingarm, fitting the screws (9) with
recommended threadlocker.
The screw (9) in the bottom hole of the rear mudguard (8) must be installed with
the washer (r).
Tighten the screws (9) to a torque of 5 nm +/- 10% (sect. 3 - 3, Frame torque
settings).
...
Chain lubrication
The chain fitted on your motorcycle has o-rings that keep dirt
out of and lubricant inside the sliding parts.
So as not to damage these seals when cleaning the chain,
use special solvents and avoid aggressive washing with highpressure
steam cleaners.
After cleaning, blow the chain dry with ...
Checking and overhauling the components
Clearance between the clutch drum and friction plates
Insert a friction plate (e) in the clutch drum (f) and measure the clearance
(s) with a feeler gauge.
Clearance "s" must not exceed 0.6 Mm.
If it does, renew the plates and, if necessary, the clutch drum.
Overhaul of the clutch plat ...