
Ducati Diavel Service Manual: Refitting the cylinder head assemblies
Warning
To prevent oil leaks past the contact area between cylinders and crankcase, each time the head is removed, cylinder and piston must be removed as well to clean the mating faces of crankcase and cylinder and restore the spoiled gaskets and o-rings and apply again liquid sealant (sect. 9 - 5, Refitting the cylinder/piston assembly).
Before fitting the head, check that the seal is fitted on the mating surface between head and cylinder (sect. 9 - 5, Refitting the cylinder/piston assembly).
Note
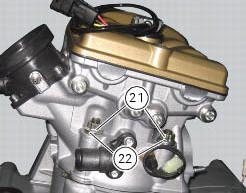
When fitting the gasket, side (e) with the stamped code must be in contact with the cylinder head.
Lower the cylinder head carefully over the studs. Take care not to damage the threads.
Fit the special washers (22) and nuts (21) onto the cylinder head studs.
Tighten the nuts (21) on the stud bolts evenly and gradually in a crosswise pattern using tool 88713.2676 In conjunction with a torque wrench.
Temporary tighten the nuts (21) to a torque of 20 nm; pre-tightening to a torque of 40 nm (min. 38 Nm - max. 48 Nm); one tightening to a torque of 60 nm (min. 57 Nm - max. 63 Nm) (sect. 3 - 3, Engine torque settings).
 Reassembly of the cylinder head
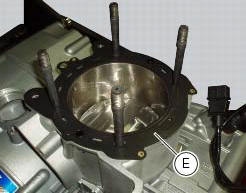
The exhaust side can be identified by the three threaded holes on the flange.
The intake side can be identified by the presence of four threaded holes on
the flange.
All the photos in this ...
 Cylinder/piston assemblies
Piston
Gudgeon pin circlip
Gudgeon pin
Set of piston rings
Cylinder-crankcase gasket
Water pump outlet union
Hose clip
Horizontal cylinder coolant inlet hose
Vertical cylinder c ...
Other materials:
Removal of the generator cover
Note
This operation is described for an engine removed from the frame since all
reassembly procedures are easier with the
engine on the bench.
Disconnect the connector (a) from the generator cable.
Unscrew the two retaining screws (7) of the centre cap (6) over the end of
the cranksh ...
Overhaul of the crankcase halves
Carefully examine the engine crankcase halves.
Check that the surfaces of the crankcase halves are perfectly flat using a
reference surface.
Check that the bearings (1) and (18), and the bushings (2) and (17) are in
optimum conditions. Note that the main
bearings must always be changed in p ...
Deactivating the service indication on the dashboard
The message "serv" is displayed on the dashboard, indicating that the
motorcycle should be serviced in accordance with
the programmed maintenance plan. This indication is activated after the first
1000 km and thereafter at intervals of
12000 km.
After the scheduled service has been carried ...