
Ducati Diavel Service Manual: Refitting the hands free
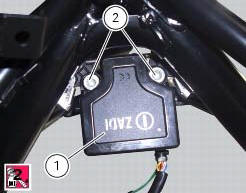
Reassembly is a reversal of the removal procedure: in particular apply prescribed threadlocker to screws (2) and tighten them to a torque of 20 nm +/- 10% (sect. 3 - 3, Frame torque settings).
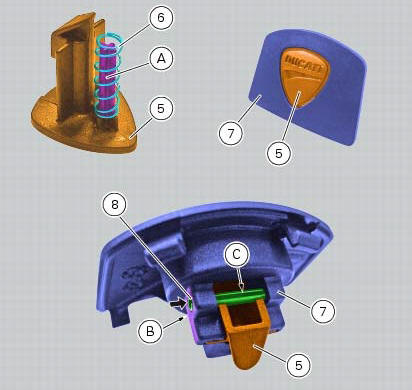
If the hands free button has been previously removed, when refitting it insert the spring (6) on pin (a) of button (5).
Introduce button (5) with spring (6) into the opening on the frame (7).
Lock the button (5) by means of a pin (8), by inserting it until reaching the surface (b) of the frame (7).
Note
Upon insertion of the pin (8), keep button (5) pressed in the direction indicated by the yellow arrow.
Warning
The opening (c) of the pin (8) must be on the opposite side of the of the surface touched by the button (5) when sliding (as shown in the figure).
To reposition the wiring refer to sect. 6 - 1, Routing of wiring on frame.
 Removing the hands free
Loosen the screws (2) and remove the hands free system (1) from the frame.
...
 Gearchange mechanism
Gearchange pedal
Bush
Rubber pad
Pin
O-ring
Gearchange lever tie-rod
Screw
Gearchange lever
Washer
Screw
Ball joint
Nut
Nut
Nut with left-hand thread
Lh ball joint
...
Other materials:
How to turn the motorcycle off
To turn the motorcycle off, turn the switch from "run on" to "run off". The
engine stops. To switch the dashboard off,
push the on/off switch downwards. When released, the switch automatically
returns to the "run off" position.
Push the switch downwards to switch the engine off and enter " ...
Removal of the timing belt covers
Loosen the screws (4) securing the central external cover (1) and remove it
from the central side.
Undo the fixing screws (4) of the external cover (25) and remove it from the
vertical thermal unit.
Undo the fixing screws (4) of the external cover (3) and remove it from the
horizonta ...
Airbox - throttle body
Airbox
O-ring
Injector
Throttle body assembly
Screw
Clamp
Intake manifold
Screw
Pressure sensor
Screw
Clamp
Hose
Sealing washer
Intake manifold
Sealing washer
Screw
Screw
Spacer
Bracket
Rubber pad
Clamp
Hose
Clamp
Union
Washer
Hose
Cable gro ...