
Ducati Diavel Service Manual: Removal of the cooling system hoses and unions

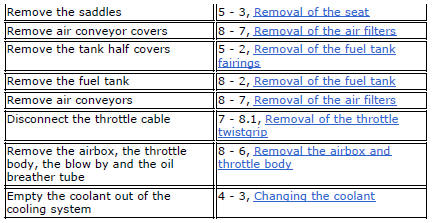
Loosen the clips (21) that secure the radiator/thermostat sleeve (40) and the radiator/plug sleeve (24) to the water radiators.
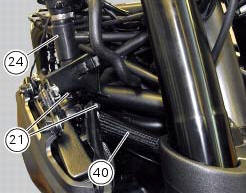

Loosen clips (25) and (43) that secure the breather pipe (26) to the radiator/plug sleeve (24) and to the left radiator.
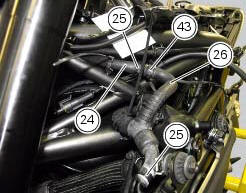
Loosen the clips (34) securing the thermostat assembly (38) - thermostat-cylinder head sleeve (35) - thermostat/cylinder head sleeve (37) to the cylinder heads.
Loosen the clip (28) to release the breather pipe (30) from the vertical head.
Loosen the clips (21) and (34) to disassemble the thermostat unit (38) - thermostat/head sleeve (35) - thermostat/head sleeve (37) - radiator/thermostat sleeve (40).
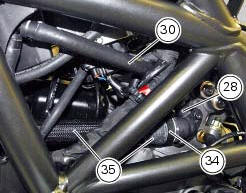
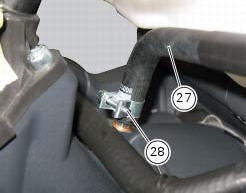
Loosen the clip (28) to release the breather pipe (27) from the half-casing.
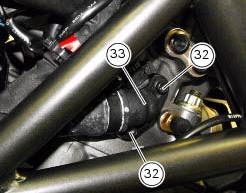
Loosen the screws (32) and remove the fitting (33).
Recover the o-ring gasket (31) located between the retainer and the vertical head.
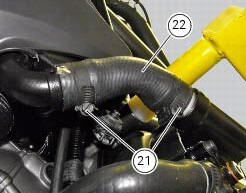
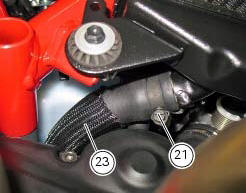
Loosen the clips (21) that secure the pump/radiator sleeve (22) and the radiator/radiator sleeve (23).
Important
Periodically check the connection hoses for leaks.
Hoses that are cracked, swollen, or hardened should be renewed.
 Refitting the expansion tank
If the support (15) has been removed, place the hose clamps (14) on the
bracket (15) orienting them as indicated.
Fully press the pins (a) to block the clamps (14) until pins surfaces (b) are at ...
 Refitting the cooling system hoses and unions
Position the pump/radiator sleeve (22) and the radiator/radiator sleeve (23).
Fit sleeve (23) and sleeve (22) to their corresponding fittings (n) and (o), and
bring them fully home on collars (p) ...
Other materials:
Battery voltage indicator (battery)
This function describes the battery voltage indicator.
To access the function it is necessary to view the ""setting" menu", using
buttons (1) "s" or (2) "t" select the "battery"
function and press the reset button (3) to confirm.
The information will be displayed as follows:
if battery vol ...
Disassembly of structural components and the frame
Before carrying out dimensional checks on the frame, you must remove all the
superstructures fitted, referring to the
removal procedures outlined in the sections of this manual.
The rear subframes (2) and (3) are structural components of the frame (1).
Both serve to support motorcycle super ...
Routing of wiring on frame
The routing of the wiring has been optimised to ensure the minimum
obstruction.
Each section is designed to prevent interference with parts that might damage
wires or cause operating failures when
riding. The plates on the following pages show the origins ("0" points) for
correct re-routin ...