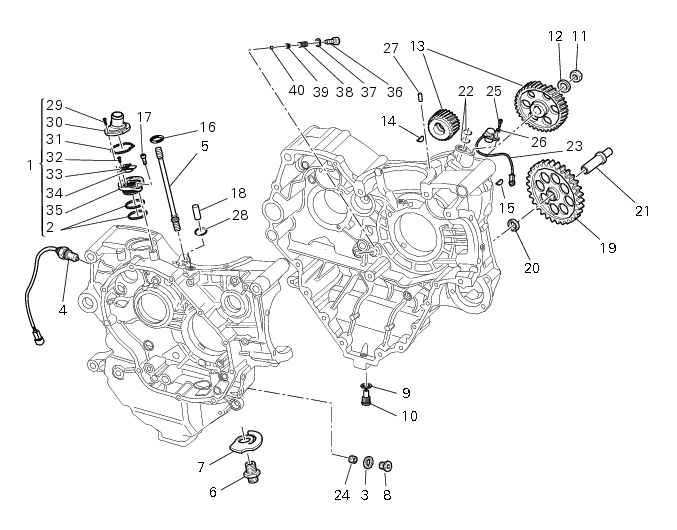
Ducati Diavel Service Manual: External components

- Oil breather valve
- O-ring
- Sealing washer
- Gear position sensor
- Cylinder barrel/head stud
- Nipple
- By-pass spring
- Plug
- Plug
- Aluminium gasket
- Nut
- Lock washer
- Timing gear pair
- Key
- Key
- O-ring
- Screw
- Locating dowel
- Starter idler gear
- Washer
- Gear shaft
- O-ring
- Engine sensor
- Grub screw
- Screw
- Washer
- Locating dowel
- O-ring
- Screw
- Upper shield
- Sealing washer
- Screw
- Spacer
- Reed
- Lower shield
- Special screw
- Washer
- Spring
- Cap
- Ball
Spare parts catalogue
Diavel abs gearchange control
Diavel abs timing system
Diavel abs crankcase halves
Diavel abs crankcase halves
Diavel abs electric starting and ignition
Diavel carbon abs gearchange control
Diavel carbon abs timing system
Diavel carbon abs crankcase halves
Diavel carbon abs crankcase halves
Diavel carbon abs electric starting and ignition
Important
Bold reference numbers in this section identify parts not shown in the figures alongside the text, but which can be found in the exploded view diagram.
- Removing outer components
- Refitting the external components
- Removal of the timing gears
- Refitting the timing gears
- Removal of the starter motor idler gear
- Refitting the starter motor gear
 Removing outer components
Note
The following removal operations are required in order to renew and/or
clean the crankcase halves. If the original
crankcase halves are to be reused, then the removal of these components ...
Other materials:
Replacing of the rear sprocket
Lock the wheel axle rotation.
Remove the clip (1).
Loosen the locking nut (2) with a socket wrench.
Fully unscrew the nut (2) and remove the washer (3) and the flange (5) with the
sprocket (17).
Collect the spacer (9).
Using a mallet, tap the flange (5) with the cush drive dampe ...
Introduction to the "hands free" system
The hands free system allows the rider to start the engine without physically
using the ignition key. The ignition key
merely has to be in the vicinity of the motorcycle, such as in the rider's
pocket, for example, in order to use the vehicle.
Compared to the standard ignition switches the h ...
Instrument panel on handlebar
Lcd.
Neutral light n (green). Illuminates when the gearbox is in neutral.
High beam light (blue).
It turns on to indicate that the high beam lights are on.
Engine oil pressure light
(red).
Illuminates when engine oil pressure is too low. It must turn
on at key-on, but ...
