
Ducati Diavel Service Manual: Refitting the timing gears
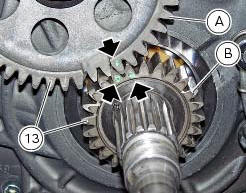
Before reassembling the removed parts, check timing gears (13) for wear. Change, if necessary.
Important
The timing gears (13) must always be renewed as a pair.
Refitting is the reverse of removal.
Warning
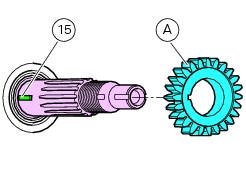
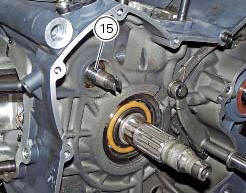
When introducing the driven gear (b) check that the tongue (15) is correctly fitted on the timing system shaft, align the gear slot with the tongue matching the driving gear timing mark (a) with the gear (b).
Important
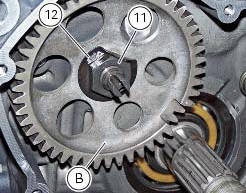
On completion of the refitting operations, check that tab washer (12) is staked against nut (11) in such a way as to prevent the nut from working loose.

 Removal of the timing gears
Slide out driving gear (a) of timing gear pair (13) and remove the woodruff
key (14).
Relieve the staking on the lock washer (12) of the nut (11).
Restrain the driven timing gear by ...
 Removal of the starter motor idler gear
Slide the gear pin (21) complete with the gear (19) and washer (20).
Warning
Pay attention to the washer (20) since it may fall inside the
crankcase half.
At this point, it is possibl ...
Other materials:
Fuel system circuit
The fuel system circuit consists of:
An electric pump, driven by the injection relay, which is in turn
controlled by the ecu (engine control unit)
A fuel filter
A pressure regulator
Two injectors (one per cylinder, located downstream of throttle valve)
The plastic mounting shown in t ...
Refitting the exhaust system
Refit the heat guard on the manifold (10) by tightening the nuts (9) to a
torque of 10 nm +/- 10% (sect. 3 - 3, Frame
torque settings).
Position the vertical exhaust manifold (22) on the vertical cylinder head
with the gasket (23).
Tighten the fixing nuts (21) to a torque of 10 nm +/- 1 ...
Disassembly of the oil pump
Hold the oil pump (1) in a vice taking care not to damage the drive gear
(12).
Warning
Make sure that vice jaws are faced with soft material.
Remove the plug (14) and extract the spring (16) and by-pass valve (17).
Check the condition of the above components.
Remove the circlip (6) ...