
Ducati Diavel Service Manual: Crankcase halves
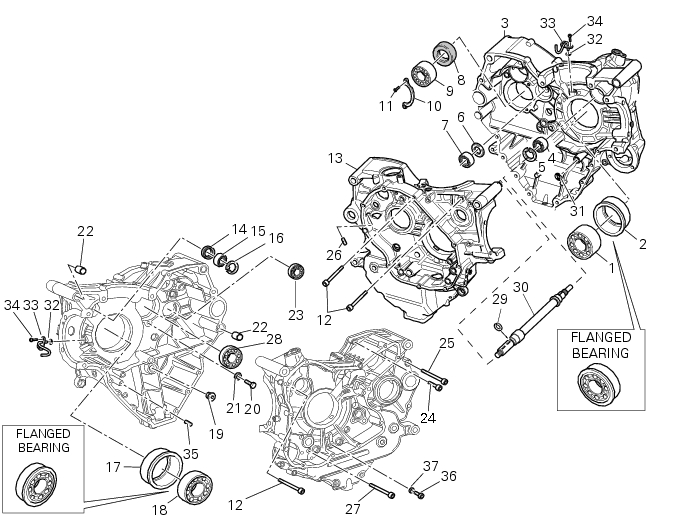
- Bearing
- Bearing holder bushing
- Alternator-side crankcase half
- Bearing
- Circlip
- Washer
- Bearing
- Sealing ring
- Bearing
- Retaining plate
- Screw
- Screw
- Clutch-side crankcase half
- Sealing ring
- Bearing
- Circlip
- Bearing holder bushing
- Bearing
- Plug
- Screw
- Spacer
- Bush
- Bearing
- Screw
- Screw
- Grub screw
- Screw
- Screw
- Circlip
- Timing belt driveshaft
- O-ring
- O-ring
- Hose
- Screw
- Grub screw
- Screw
- Sealing washer
Spare parts catalogue
Diavel abs timing system
Diavel abs crankcase halves
Diavel abs crankcase halves
Diavel carbon abs timing system
Diavel carbon abs crankcase halves
Diavel carbon abs crankcase halves
Important
Bold reference numbers in this section identify parts not shown in the figures alongside the text, but which can be found in the exploded view diagram.
- Separation of the crankcase halves
- Overhaul of the crankcase halves
- Main bearings
- Reassembly of the crankcase halves
- Shimming the shafts
- Reassembly of the crankcase halves
 Refitting the starter motor gear
Position the washer (20) and the gear (19) in the pin (21) and take the pin
into contact with the crankcase half.
...
 Separation of the crankcase halves
Use two screwdrivers to remove the circlip (29) from the timing belt
driveshaft shaft (30) on the clutch-side crankcase
half.
Note
Take care to avoid scoring the surface of the shaft while re ...
Other materials:
Checking the coolant level
To the specified intervals in the "scheduled maintenance chart" (sect. 4 - 2)
Check the coolant level contained in
the expansion reservoir, on the right side of the vehicle.
The coolant level must be between the max. And min marks on the tank.
If the level is low, top up with the recommende ...
Adjusting throttle control free play
The throttle twistgrip must have free play of 1.5×2.0 Mm in
all steering positions, measured on the outer edge of the
twistgrip. If necessary, adjust it using the adjusters (1 and 2,
fig. 135) Located on the headstock on the right-hand side of
the vehicle.
Adjuster (1) is for throttle o ...
Removal of the intake manifold and coolant union
Loosen the clips (f) and remove the hoses (t).
Remove the manifolds (25) undoing the screws (21).
Loosen the clamp (a) and remove the hose (b). Remove the union (12) and
recover the seal (24).
...