
Ducati Diavel Service Manual: Rear brake
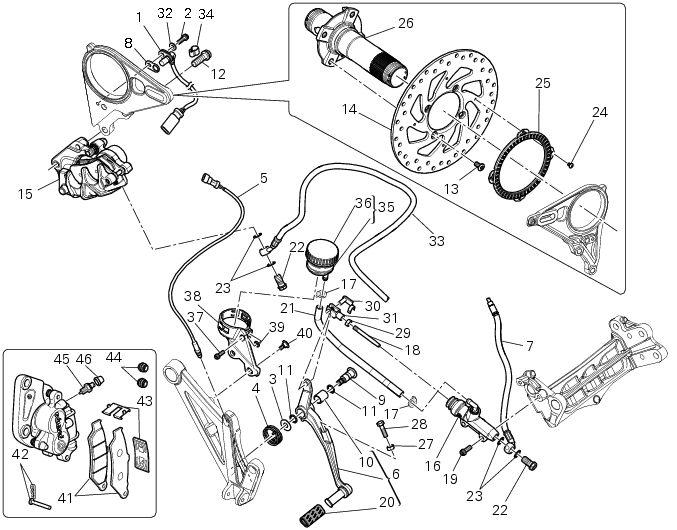
- Rear speed sensor (abs)
- Screw
- Washer
- Spring
- Brake switch (rear)
- Brake lever (rear)
- Rear pump - control unit pipe
- Sealing washer
- Pin
- Bush
- O-ring
- Screw
- screw
- Rear brake disc
- Rear brake calliper
- Rear brake master cylinder
- Hose clip
- Pushrod
- Screw
- Rubber pad
- Hose
- Special screw
- Sealing washer
- Screw
- Phonic wheel
- Rear wheel shaft
- Nut
- Screw
- Nut
- Quick-release fastener
- Fork
- Washer
- Control unit - rear calliper pipe
- Cable grommet
- Fluid reservoir assembly
- Plug
- Screw
- Support
- Spacer
- Screw
- Pair of brake pads
- Spare clip pins
- Clip spring
- Boot
- Bleed valve
- Dust cap
Spare parts catalogue
Diavel abs rear brake
Diavel abs antilock braking system (abs)
Diavel abs rear wheel axle
Diavel carbon abs rear brake
Diavel carbon abs antilock braking system (abs)
Diavel carbon abs rear wheel axle
Important
Bold reference numbers in this section identify parts not shown in the figures alongside the text, but which can be found in the exploded view diagram.
- Removing of the rear brake control
- Disassembly of the rear brake control
- Refitting the rear brake control
- Removal of the rear brake calliper
- Removal of the rear brake disc
- Refitting the rear brake calliper
 Refitting the front brake system
While refitting the system, pay special attention to the orientation of the
pipe couplings (24) on the pump and the pipes
(13) and (20) on the callipers (9) and (18).
Warning
If incorrectly posit ...
 Removing of the rear brake control
Warning
The brake master cylinder manufacturer advises against servicing the
brake master cylinder due to the safety critical
nature of this component.
Incorrect overhaul can endanger the rider ...
Other materials:
Removing the frame and the lateral footrests
Loosen the two special screws (6) to separate the frame (1) from the lateral
brackets (2) and (3).
On the left side of the vehicle block retaining pins (9) and loosen the nuts (8)
on the right side at the same time.
Slide out the retaining pins (9) and remove the frame (1) from the lateral ...
Tips for use on the road
Activate the dtc, select level 8 and ride the motorcycle in
your usual style; if the level of dtc intervention seems
excessive, try reducing the setting to levels 7, 6, etc., Until
you find the level that suits you best.
If changes in the grip conditions and/or circuit characteristics
and/or ...
Removal of the fuel tank
On the usa version remove the canister filter as indicated in sect. 8 - 10,
"Removal of the evaporative emissions
canister".
Loosen and remove the front retaining screw (4)
Remove the flange cover (a) by loosening the screws (b), disconnect the
quick-release fittings (c) from the fl ...